Vimeo is a video platform alternative to YouTube. What Vimeo is often used for is publishing content that is only accessible after paying a little fee. Instead of producing and shipping DVDs, especially sports promotions use Vimeo to broadcast and share shows or matches. Of course, you can upload videos to be freely accessible as well.
For many, Vimeo is a way to escape many of YouTube’s flaws. You can do so too, especially now that we can help you to optimize your videos perfectly for Vimeo!
All you need: Convert Videos For Vimeo
Upload Videos To Vimeo
Of course, you can manually change different aspects of your video in order to optimize it for uploading to Vimeo. This includes, all and foremost, the file format. But aspects like bit rate, frame rate, different codecs and screen resolution have been explained as well.
Now, there is an easier way to get your video ready for Vimeo – without manually inducing all these changes! The following tutorial will show you how you can easily optimize your video for Vimeo in just three steps.
How To Prepare a Video Ready For Vimeo
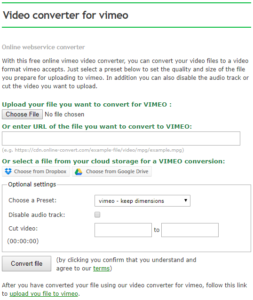 With our new webservice converters, you can easily optimize videos for different online platforms such as YouTube or Facebook. The Vimeo converter will automatically optimize your video. Check out how it’s done:
- Upload your file
Possible from your hard drive, a cloud service or via URL - If needed, use the optional settings
For an explanation, check below - Click on “Convert file”
And that’s it. On the next page, you can download your video (if your browser isn’t doing it automatically) and upload it to Vimeo.
The Optional Settings
In just three steps, you can get your video ready for upload. You can do a little bit more with the help of the optional settings provided though. Below, we explain how these optional settings will change or customize your video.
Presets
Quick changes with regards to quality, screen resolution and frame rate of your video can be applied by using a so-called preset. Check the table below to see what is possible/available.
| Quality | Screen Resolution | Frame Rate |
| keep dimensions | ||
| HQ | 1920×1080 | 23.976p |
| 25p | ||
| 30p | ||
| 1280×720 | 23.976p | |
| 25p | ||
| 30p | ||
| 480p | 23.976p | |
| 25p | ||
| 30p | ||
| 360p | 23.976p | |
| 25p | ||
| 30p | ||
| 4k | 23.976p | |
| 25p | ||
| 30p | ||
| 2k | 23.976p | |
| 25p | ||
| 30p | ||
| MQ | 1920×1080 | 23.976p |
| 25p | ||
| 30p | ||
| 1280×720 | 23.976p | |
| 25p | ||
| 30p | ||
| 480p | 23.976p | |
| 25p | ||
| 30p | ||
| 360p | 23.976p | |
| 25p | ||
| 30p | ||
| 4k | 23.976p | |
| 25p | ||
| 30p | ||
| 2k | 23.976p | |
| 25p | ||
| 30p | ||
Mute The Video
Of course, your video will have an audio track by default. However, in some cases, it might be interesting or desired to remove the audio. If that’s the case, simply check the box before starting the conversion.
Cut Video
You only want to upload a part of your video? Or cut out end and beginning? Then you can do so by using the cut video function. There are no video editing skills needed. Just enter the starting and ending date of the part you want to keep in the video into the according field.
The format is: HH:MM:SS
Other Articles You Might Be Interested In
Tips & tricks for using YouTube: