File management on the iPhone isn’t as robust as on a Mac, but the iPhone Files app can still be useful once you get the hang of it. So, if you want to master the Files app on your iPhone, this guide will walk you through everything you need to know!
1 Navigation
Here’s a breakdown of the main navigation features to help you get started.
Bottom Navigation Bar
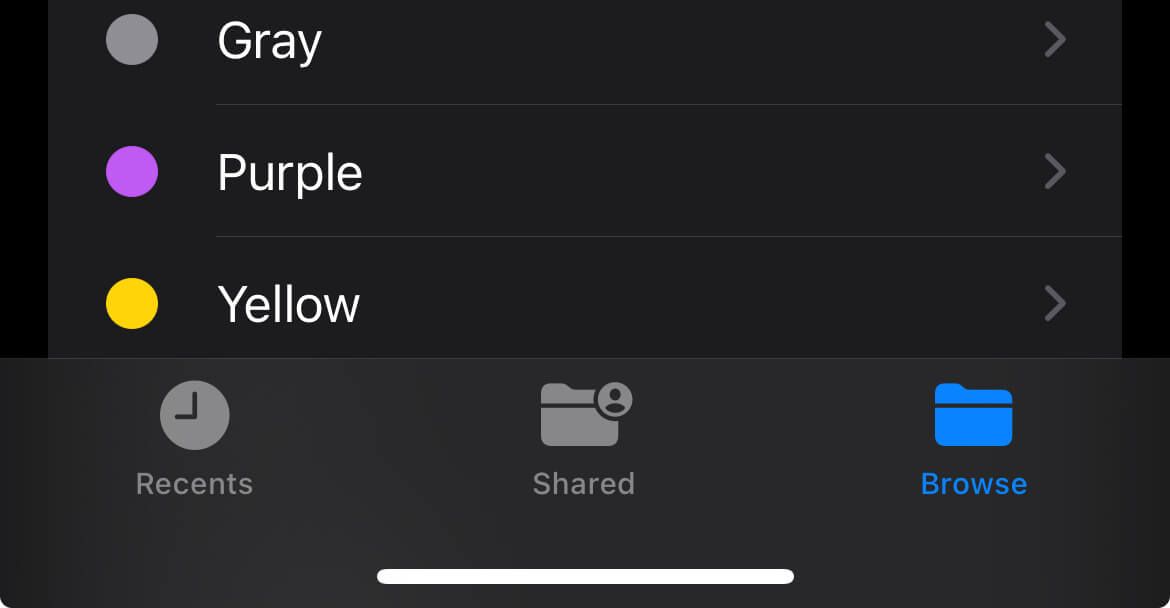
At the bottom of the Files app, you will find three main sections: Recents, Shared, and Browse.
Recents
On the bottom left, you’ll see the Recents section. This shows any files you have opened or edited in chronological order. If you are looking for something you recently worked on, this is the place to go. Plus, there’s a search box at the top to quickly find files.
Shared
In the center is the Shared section. This is where you will find files and folders that others have shared with you or that you have shared with others. It’s perfect for keeping track of collaborative projects.
Browse
On the bottom right is the Browse section, which functions similarly to the Finder window on a Mac. Here, you have three options: Locations, Favorites, and Tags.
Locations
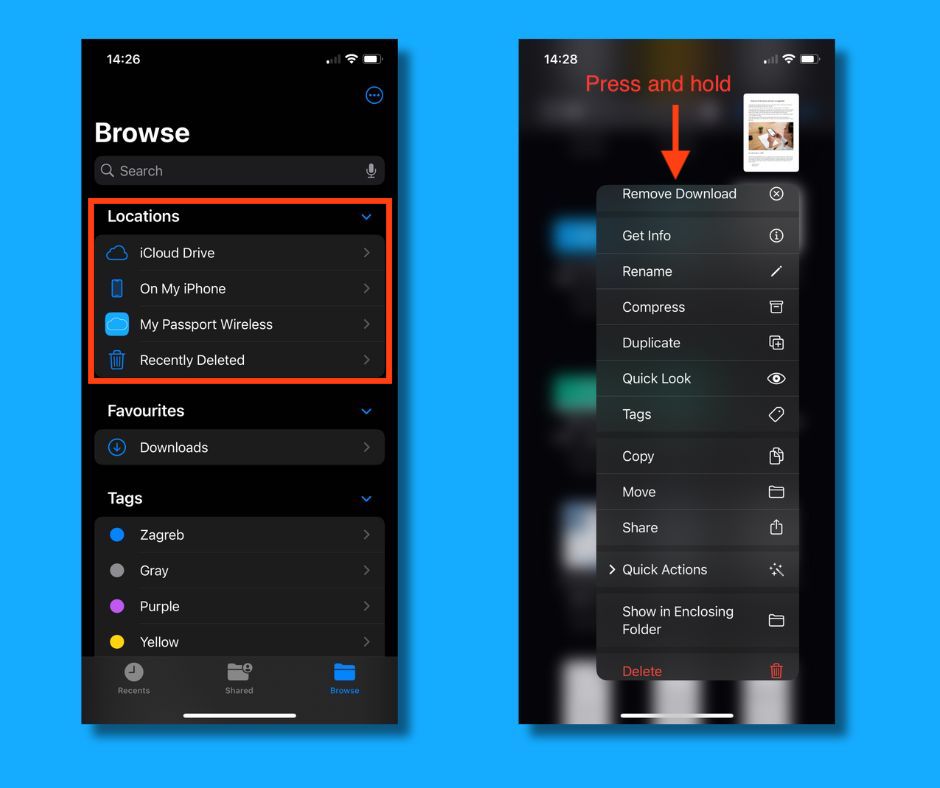
Under Locations, you can access various storage services:
- iCloud Drive: For your cloud-based files.
- On My iPhone: For files stored locally on your iPhone.
- Third-Party Services: Such as Dropbox, Google Drive, and Box. To add a new service, download the relevant app from the App Store and log in. The integration happens automatically. You can enable or disable these locations using the green toggle switches and reorder them by dragging them.
- Recently Deleted: Right under Locations, you’ll find Recently Deleted. This is where deleted files are stored for 30 days before being permanently removed. It’s a safety net if you accidentally delete something important.
Ellipsis Menu (Three Dots)
In the upper right corner, there’s an ellipsis menu (three dots) that offers several important options:
- Scan Documents: Tap this to scan physical documents using your iPhone’s camera. Adjust settings like color or monochrome before saving.
- Connect to Server: If you have a network storage device like a NAS drive, use this option to connect to it.
- Edit Locations: Tap Edit to enable or disable different file locations and reorder them.
Viewing Files
To view your files, tap into any location, like iCloud Drive. You can switch between icon and list views by tapping the ellipsis menu and selecting your preferred view. This helps you organize and find files more efficiently.
2 Interacting with Files
Interacting with files on the iPhone Files app is straightforward once you get familiar with its features. Here’s a rundown of the essentials:
Opening and Viewing Files
When you tap on a file, it opens in a preview mode called Quick Look.
For instance, if you open a PDF, it will display the document so you can read through it. At the bottom left, you will find a Share option, allowing you to either send a copy of the PDF or collaborate on it with others. You can also search for specific words within the PDF using the Search option. On the bottom right, there’s the Markup tool, where you can annotate the document with different pen and pencil options.
File Options Menu
At the top of the preview, next to the file name, is a downward-pointing arrow. Tapping this reveals several options:
- Lock the file (specific to PDFs)
- Duplicate
- Move
- Rename
- Share
These options are generally consistent across different file types, though some additional choices may appear based on the file.
Long Press Actions
For another way to interact with files, you can long press (tap and hold) on a file until a menu appears. This menu gives you quick access to:
- Copy
- Move
- Share
Remove Download Option: Keeps the file in iCloud but removes it from your device to save space. Delete: This permanently deletes the file from both your device and iCloud Drive.
The long press menu has been updated in iOS 18 to make Copy, Move, and Share more accessible, reflecting user preferences.
Quick Actions
Quick Actions provides file-specific shortcuts. For example, you can convert multiple images into a PDF or optimize a PDF’s file size by reducing image resolution. These actions change depending on the file type you’re working with, offering tailored options for images, videos, documents, and more.
Managing Multiple Files
To manage multiple files, tap the ellipsis (three dots) in the upper right and select Select. You can then choose multiple files and perform batch actions like:
- Duplicate
- Move to Folder
- Delete
- Create PDF: Combine multiple documents or images into a single PDF file.
Additional Tips
Landscape Mode: The Files app supports landscape mode. Just turn off the orientation lock and rotate your device.
Multi-Select: Use two fingers to swipe down and select multiple files quickly. Tap on files to deselect them.
These features make file management on the iPhone both powerful and flexible, allowing you to handle documents, images, and more with ease.
3 Working with Different File Types in the iPhone Files App
Here’s how to handle various file types using the Files app:
Cloud-Based Files
When browsing through your files, you might notice some files with a cloud icon and a downward-pointing arrow. This icon indicates that the file is stored in the cloud and is not currently downloaded to your device. To access these files:
- Download a File: Tap on the cloud icon or the file itself. This action downloads the file to your device and opens it.
Viewing and Editing Files
The way files open and interact within the Files app largely depends on whether the appropriate app for that file type is installed on your device.
- Quick Look Preview: If the app required to open a file is not installed, tapping on the file will open a Quick Look preview. For instance, if you have a Pages document but don’t have the Pages app installed, you will only see a preview.
- Full Editing: To edit a file, such as a Pages, Keynote, or Numbers document, ensure the corresponding app is installed. When you tap on the file, it will open in its respective app where you can then edit the document. Changes are automatically saved and reflected in the Files app.
4 Working with Images in the iPhone Files App
The iPhone Files app provides various ways to manage and manipulate images.
Importing Images from Photos to Files
By default, images captured on your iPhone are stored in the Photos app. However, you can transfer these images to the Files app for further management. Here’s how:
- Open the Image in Photos: Select the image you want to move to the Files app.
- Share to Files: Tap the Share button, scroll down, and select “Save to Files”.
- Choose Destination Folder: The Files window will appear. Choose the folder where you want to save the image and press “Save”. Now, the image will be available in the Files app within the specified folder.
Viewing Images in Files
Once an image is saved in the Files app, tapping on it will open a Quick Look preview. While Quick Look is convenient for viewing, it lacks the editing features found in the Photos app.
Manipulating Images with Quick Actions
You can perform several actions on images stored in the Files app:
- Quick Actions Menu: Tap and hold on the image to open the Quick Actions menu.
- Rotate: Rotate the image 90º to the left or right.
- Create PDF: Convert the image, or multiple images, into a PDF document.
- Convert Image Format: Convert the image to JPEG, PNG, or HEIF format. When converting, you can choose the size: small, medium, large, or original.
- Remove Background: One of the advanced features available in the Files app is the ability to remove backgrounds from images.
5 Working with Shared Files & Folders in the iPhone Files App
The Files app offers robust options for sharing files and folders with others, making collaboration easy.
Accessing Shared Files and Folders
To view files and folders that have been shared with you or that you’ve shared with others, use the “Shared” tab:
- Open the Shared Tab: Tap on the “Shared” option at the bottom of the Files app screen, which is located in the middle of the screen.
- View Shared Content: Here, you can see all the files and folders shared with you and those you’ve shared.
Sharing a Folder
To share a folder with others, follow these steps:
- Find the Folder: Go to the “Browse” section and locate the folder you want to share.
- Open Sharing Options: Tap and hold the folder for a moment. In iOS 18, the share button will be at the top of the screen; in iOS 17, it might be further down.
- Select Share Option: Tap the share button. You will see two main options:
- Send a Copy: This will send a copy of the folder’s contents to someone else.
- Collaborate: This option adds the recipient as a collaborator in iCloud Drive, allowing them to view, edit, add files, and make changes.
- Send Collaboration Request: Choose “Collaborate” and send the collaboration request via text message. The recipient must accept the request to start collaborating.
Managing Shared Folders
Once you have shared a folder, you can manage it by following these steps:
- View Shared Folder: Go to the “Shared” tab and select the folder you’ve shared.
- Access Sharing Options: Tap the “Options” button at the top of the screen.
Here, you can:- Share with More People: Add additional collaborators to the folder.
- Remove People: Remove existing collaborators.
- Adjust Share Settings: Choose who can access the folder, what permissions they have (view or edit), and whether they can invite others.
- Copy Sharing Link: Copy the link for sharing with others.
- Stop Sharing: Remove sharing permissions altogether.
6 Useful Functions in the iPhone Files App
Easily save email attachments like PDFs directly to the Files app, choosing locations such as iCloud Drive’s Documents or Downloads folders, or even saving locally on your iPhone for offline access.
To share multiple files, compress them into a zip file using the Shortcuts app. Simply select your images in Photos, use the “Zip and Email” shortcut, and an email draft with the zip file will be prepared. If you receive a zip file, save it to Files and then either tap to automatically unzip or use the “Uncompress” option from the context menu.
7 Favorites & Tags
To wrap up our exploration of the Files app, let’s cover the final features: Favorites, Tags, and search functionalities. These tools will help you better organize and manage your files.
Favorites
The Favorites feature lets you quickly access important folders:
Add to Favorites:
- Tap and hold on a folder.
- Select Favorite from the contextual menu.
- The folder will appear in the Favorites section under Browse.
Remove from Favorites:
- Swipe left on the folder to reveal the Remove option.
- Alternatively, tap the ellipsis menu (three dots) at the top, select Edit, then tap the red circle with a white line to remove it.
- You can also tap and hold on the folder and choose Remove from the contextual menu.
Tags
Tags help categorize and organize files for easier management:
- Add Tags:
- Tap and hold on a file.
- Select Tags from the contextual menu.
- Choose existing tags or create new ones by tapping Add New Tag. You can assign a color and name to the new tag.
- Tap on the desired tags and then Done.
- View Tagged Files:
- Go back to the Browse page and tap on a tag to see all files associated with that tag.
- Manage Tags:
- Tap and hold on a tag to Rename or Delete it.
Searching for Files in the Files app
Effective searching is crucial for managing large numbers of files.
- Search Within Files App:
- Tap the search bar at the top of the screen.
- Type in your query (e.g., “contract”).
- You can refine your search by adding additional terms or tags.
- Spotlight Search:
- Swipe down on the home screen to access Spotlight Search.
- Type your query (e.g., “contract”).
- Spotlight Search will include results from the Files app and other sources, allowing you to find files quickly.
Additional Tips
- View Options:
- Tap the ellipsis (three dots) in the top right corner of a folder.
- Select View Options.
- You can group files by kind, date, size, or who they were shared by. Sort by these criteria and adjust the icon and list sizes to show more files or file extensions.
- Undo Feature:
- Tap and hold on the screen to access the Undo option.
- This allows you to revert the last action taken in the Files app, such as editing tags.
In Conclusion: iPhone Files App
The Files app offers a range of features to help you manage your documents and other files effectively. While it may not be the most advanced file management system, mastering these functions will make it much easier to use and more efficient for your needs. With Favorites, Tags, and effective search capabilities, you can keep your files organized and easily accessible. Give it a try!