Struggling with image sharpness in your photos? Most new photographers do. In this article, we will address this sharpness issue head-on (and assist you in fixing it).
Here you can explore 6 essential factors affecting sharpness of image, including the role of the aperture. By the end, you will capture sharper, more striking photos with confidence. Let’s begin this journey of achieving sharper images now!
What is Image Sharpness
Image sharpness is the visual clarity and crispness of a photograph. It’s what transforms a picture from being merely good to absolutely captivating. When a photo is sharp, every detail is distinct and well-defined, making the subject stand out with precision.
Think of it like looking through a clean window versus a foggy one. Sharpness allows you to see the world within the frame with utmost clarity, from the finest textures of a flower petal to the twinkle in a person’s eye.
To achieve image sharpness, it’s vital to understand the factors that influence it. Several elements work in harmony to determine how sharp your images will be.
1. Key Factor: Best Light for Sharper Photos
Achieving sharpness in your photos starts with harnessing the power of light. The quality and direction of light play a pivotal role in determining how sharp your images will turn out.
When we talk about sharpness, we are essentially talking about micro-contrast — the distinction between sharp, bright areas and their adjacent darker counterparts. This interplay of light and shadow adds depth and texture to your photographs.
The Role of Directional Light
Shooting in well-lit conditions is essential. For the best results, seek out directional light.
Directional light, like sunlight or a controlled external source such as a flash or LED panel, creates those coveted areas of micro-contrast. These bright, well-lit edges make your subject stand out sharply against its surroundings.
On the flip side, dull and overcast weather poses a challenge. In such conditions, light scatters in multiple directions, failing to create the pronounced micro contrast needed for ultimate sharpness. A photo taken on a cloudy day might still capture the subject but lack the striking sharpness seen in images captured in optimal light conditions.
2. Noise
Poor lighting conditions can lead to noisy images, hampering the overall visual impact of your photographs.
The Link Between Poor Light and High ISO
In the world of photography, high ISO settings often get the blame for introducing noise. However, it’s essential to grasp the underlying concept: it’s not the ISO itself that introduces noise but the necessity to push ISO higher due to inadequate light conditions.
When shooting in poor light, your camera’s sensor struggles to capture enough light to create a well-exposed image. To compensate for this, you might raise the ISO setting, making the sensor more sensitive to light. Unfortunately, this can lead to an increase in image noise, resulting in photographs with less color accuracy, less contrast, and less detail.
The Importance of Adequate Lighting
As previously mentioned, to maximize image sharpness and minimize noise, prioritize shooting in optimal lighting conditions. Ensure that your subjects are well-lit and reduce the need to rely on high ISO settings. This approach will result in images that are not only sharp but also vibrant in detail.
3. The Significance of Shutter Speed in Achieving Image Sharpness
Lack of sufficient shutter speed often contributes to images falling short of desired sharpness. The role of shutter speed is crucial, addressing two key aspects that impact the clarity of your photographs.
Freezing Subject Movement
Achieving sharpness hinges on your ability to freeze subject movement. Whether it’s wildlife, sports, or swiftly moving vehicles, faster shutter speeds are imperative. Subjects in motion necessitate faster shutter speeds compared to static objects. When your shutter speed is not adequately swift, moving subjects can blur as they traverse through the frame during the exposure, resulting in less defined images.
Steadying Hand-Held Shots
If you are capturing handheld shots, the right shutter speed is crucial to counteract any camera movement caused by unsteady hands. Even the slightest handshake can lead to subtle blurring in your images. To overcome this, you must employ an appropriate shutter speed to ensure that your shots remain sharp and true to the intended composition.
Determining the correct shutter speed for your shots involves considering both the movement of your subject and the stability of your camera.
4. The Role of Focus
Another significant factor that can impact image sharpness is focus.
To capture a truly sharp photograph, your subject — whether it’s a person, an object, or a scene — must be in focus. Achieving this level of focus can be a determining factor in the overall sharpness of your image.
Two Types of Autofocus Systems
Most cameras are equipped with two primary autofocus systems: “One-Shot” and “Autofocus Continuous.” Understanding these systems is vital to getting your focus right.
- One-Shot Autofocus: This mode is designed for static subjects. It locks and holds focus on a particular plane, ensuring that the chosen area remains sharp. It often confirms focus with a beep, assuring that your subject is in focus.
- Autofocus Continuous (AFC): This mode is tailored for moving subjects, such as sports or wildlife. In this mode, the focus area adjusts continuously as the subject moves within the frame. It’s like having a flexible focus that moves along with your subject, keeping it sharp even as it shifts position. In Nikon and Sony cameras, it’s referred to as “Autofocus Continuous” (AFC), while Canon calls it “AI Servo.”
5. Consider Heat Radius for Sharper Images
In the pursuit of image sharpness, an unexpected culprit emerges. The heat radius. It occurs when heat waves rise from surfaces that have been sun-soaked all day, such as cement, open fields, asphalt, or bodies of water.
The heat radius creates a wavy distortion. In photography, this distortion can lead to softer images, robbing them of the crispness you desire. Interestingly, this effect becomes more pronounced with longer focal lengths. The reason is simple: you must shoot through more shimmering air, magnifying the distortion.
Mitigating the Heat Radius Effect
To counter the heat radius and its impact on image sharpness, a strategic approach is necessary:
- Timing Matters: Shoot during the earlier hours of the day when surfaces haven’t absorbed as much heat. This reduces the heat radius effect, resulting in clearer images.
- Get Closer: If possible, move closer to your subject. Shooting through less shimmering air minimizes the distortion caused by the heat radius.
- Seek Shade: Shooting in shaded areas helps avoid the heat radius effect.
- Indoor Advantage: When possible, consider shooting indoors. Being shielded from the heat of the day eliminates the risk of heat-related distortion.
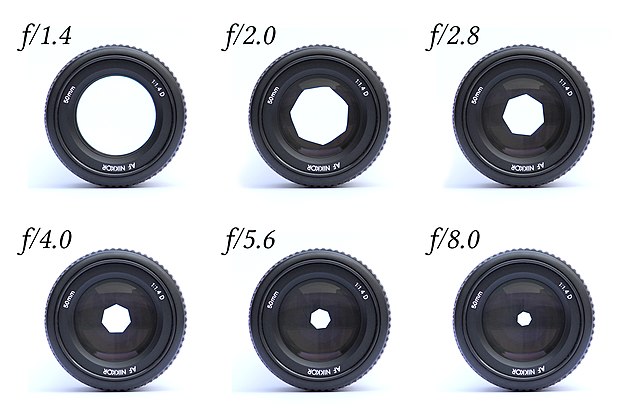
6. Aperture
So, how is the sharpness of the image affected by the aperture?
Well, aperture is a key player in the realm of photography. It holds an essential role in achieving image sharpness.
Use Sharpest Aperture
Selecting the right aperture setting is more than just a technical decision — it can enhance the overall quality of your images. Most lenses are sharper at the center than on the edges. By reducing the size of the aperture of the lens, you use the part of the lens that’s the highest quality. In other words, you will capture images with remarkable sharpness.
Stopping Down
One technique to enhance lens sharpness is to “stop down” the aperture. This involves reducing the size of the aperture, allowing only a controlled amount of light to reach the sensor. By doing so, you utilize the lens’s optimal zone, resulting in images that are crisp and defined.
Many lenses experience a noticeable improvement in sharpness when stopped down by about one stop. For example, an f/4 lens could be stopped down to f/5.6, while an f/5.6 lens may be stopped down to f/8.
Keep in mind that the ideal aperture for maximizing sharpness can vary based on the lens and camera body combination. It’s essential to experiment and find the sweet spot for your specific gear. An effective way to determine your lens’s sharpest aperture is to conduct field tests.
Limitations to Consider
While stopping down can lead to improved sharpness, remember that there are limits. Extremely small apertures can lead to a decrease in image quality due to factors like high ISO noise and diffraction. It’s crucial to strike a balance and avoid excessively tiny apertures that might compromise image quality.
Additional Tip: The Art of Staying Still
Waving your camera around and hoping for sharp results is akin to chasing a mirage in the desert—a pursuit that often leads to disappointment and missed opportunities.
Achieving sharpness demands a level of control and precision that extends beyond the point-and-shoot approach. Remember: whether you are shooting handheld or using a tripod, mastering technique is a crucial aspect of producing consistently sharp images.
Handheld Techniques
When shooting handheld, several techniques can help stabilize your camera and mitigate movement-related challenges:
- Minimize Camera Movement: Keep your subject steady within the frame by ensuring your camera’s movement is controlled.
- Dampen Shutter Vibration: The act of pressing the shutter button can introduce subtle vibrations. Tuck your elbows in against your chest to restrict vertical movement.
- Secure Your Grip: Hold the camera and lens firmly, minimizing unintended camera shake caused by an unstable grip.
- Opt for the Viewfinder: Shooting through the viewfinder provides a more stable point of contact compared to using the back LCD screen.
- Whole-Body Panning: When capturing moving subjects, use your entire upper body to pan, rather than relying solely on your arms. This approach is more stable, especially when your elbows are tucked in.
- Gentle Shutter Release: Depress the shutter button gently to avoid abrupt movements that could blur the shot. Rolling your finger over the button is a smoother alternative.
In Conclusion
We have journeyed through an array of factors that influence the clarity and crispness of our photographs.
While gear undoubtedly has its place in the pursuit of image sharpness, it’s imperative to recognize the profound significance of technique. Technique serves as the linchpin that ties all these factors together.
Armed with this newfound knowledge, may your photographic endeavors be marked by enhanced sharpness! Let your photography tell a story — one that’s not just sharp in detail, but also rich in narrative, emotion, and artistic expression.
Advanced Image Conversion & Image Sharpness
Ready to explore an image converter’s impressive functions and witness how it can elevate image sharpness and clarity?
Online Convert’s Image Converter is a tool that goes beyond format-to-format conversion — it also applies color filters, alters DPI value, and offers an array of options for additional enhancements.
Among these, standout features include:
- Enhance: Improves overall image quality by adding more detail and clarity.
- Sharpen: Enhances edge and detail sharpness, making the image stand out.
- Antialias: Reduces aliasing effects on image edges, resulting in a smoother appearance.
- Despeckle: Removes minor noise from the image, further cleaning up details.
- Equalize: Evenly distributes brightness and contrast, enhancing the overall image balance.
- Normalize: Achieves color and contrast uniformity across the entire image.
- Deskew: Corrects slight image tilts, improving composition.
Thanks to these advanced functionalities, the converter can not only convert different image file formats, but also significantly enhance their sharpness, clarity, and quality. Integrate this free online image converter into your workflow today!