When it comes to streaming video gameplay or other activities like illustrating and drawing, Twitch has risen to the top since it was launched in 2011. It’s a great alternative to live streams on Facebook or YouTube and especially popular y video gamers.
Next to streaming, however, you can also upload videos to Twitch. The feature is still in Beta, but it’s a great way to make sure your audience has something to watch even when you are not live streaming. In order to make sure your video meets the requirements by Twitch, we created a way for you to convert your videos to perfectly fit Twitch!
All you need: Convert Videos For Twitch
Upload Videos To Twitch
Different websites, such as social media platforms like Facebook or video platforms like YouTube, have different technical requirements for the videos you can upload there. Screen resolution, duration, bit rate, frame rate and some others have to be taken into consideration in order to not get an error. Once all these requirements are met, the video is perfectly optimized for uploading to the website, service or messenger app.
However, making sure all requirements for the video in order to upload it was quite the hassle. Oftentimes, all information had to be manually set – and looked up beforehand – in order to provide the perfect video outcome, for example by using a video converter. This is why Online-Convert.com developed a much easier and faster way!
How To Optimize Your Video For Twitch
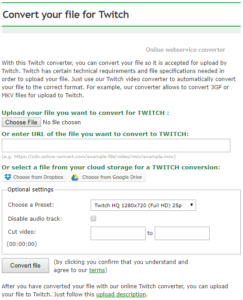 The new webservice converters of Online-Convert.com provide a way to get your video ready to upload it to social media and video sharing platforms in a convenient way. The one to go to when you want to upload your video to Twitch is the:
Check out the tutorial below.
- Upload your video
Browse your hard drive, choose a file from a cloud storage or enter a link - If needed, use the optional settings
They are explained below - Click on “Convert file”
And that’s all it takes to optimize your video for Twitch. After the video is converted, you can download it or save it on a cloud storage until you are ready to upload it.
Optional Settings For Video Optimization
The three steps above are all you need to do to convert your video for Twitch uploading. However, if you want to go a step further, you can use the optional settings to easily change or customize your video further.
Presets
Presets are an easy and fast way to apply a couple of changes to a video all at once. The following list shows the presets available and how they change a video when it comes to quality, frame rate, and screen resolution.
| Quality | Screen Resolution | Frame Rate |
| HQ | 1280×720 | 23.976 |
| 25 | ||
| 30 | ||
| 1920×1080 | 23.976 | |
| 25 | ||
| 30 | ||
| 2K | 23.976 | |
| 25 | ||
| 30 | ||
| 4K | 23.976 | |
| 25 | ||
| 30 | ||
| 480p | 23.976 | |
| 25 | ||
| 30 | ||
| 360p | 23.976 | |
| 25 | ||
| 30 | ||
| MQ | 1280×720 | 23.976 |
| 25 | ||
| 30 | ||
| 1920×1080 | 23.976 | |
| 25 | ||
| 30 | ||
| 2K | 23.976 | |
| 25 | ||
| 30 | ||
| 4K | 23.976 | |
| 25 | ||
| 30 | ||
| 480p | 23.976 | |
| 25 | ||
| 30 | ||
| 360p | 23.976 | |
| 25 | ||
| 30 |
Mute Audio
Of course, in most cases, you want the audio of your video to be untouched. In case you want to mute your video though, you can opt to remove the audio stream.
Cut Video
Sometimes, you don’t want to upload the whole video clip you took. If that’s the case, you can cut your video easily by stating a start and end time. The format is: HH:MM:SS