Editing videos is a difficult and very creative task. It requires focus, a keen eye for details, and a lot of patience. The last thing you need during this process are obstacles that keep you from being productive and creative!
Many of these issues, errors or problems – however you want to put it – can be prevented. Or at least easily worked around and resolved.
Resolve Video Import Issues
This article is based on the personal and professional experiences of our co-workers. Using different video editing programs, they have run into particular issues over and over. Thus, the following errors and respective solutions are tested and approved of by our Online Convert team.
Frame Rate Issues
Problem: Video import fails because of non-concurrent frame rates
Solution: Change video frame rate
Many video editing programs allow you to set a frame rate when creating a new project. This frame rate has to be the same among all video clips you import into the project. Sometimes, you have the option to set the project’s frame rate to “auto” or “mixed” as well. What if your video clips have different frame rates though? Then, your video editing program can give you an error and you are unable to import your clip.

The screenshot above shows the error in the video editing program Lightworks. The MOV video file that should be used in a video project couldn’t be imported due to the wrong frame rate – either in the project or in the video. One way to solve this is by creating a new project with a frame rate that fits the video clip. This is quite inconvenient if you already started working on the project.
The other way is to change the frame rate of the video clip. That way, you don’t lose the progress you already made. And it’s quite easy as well. All you need is an online video converter. That way, you can also change the format of your video if you want to. In our case, we can either use a MOV converter to retain the format or an MP4 converter for example.

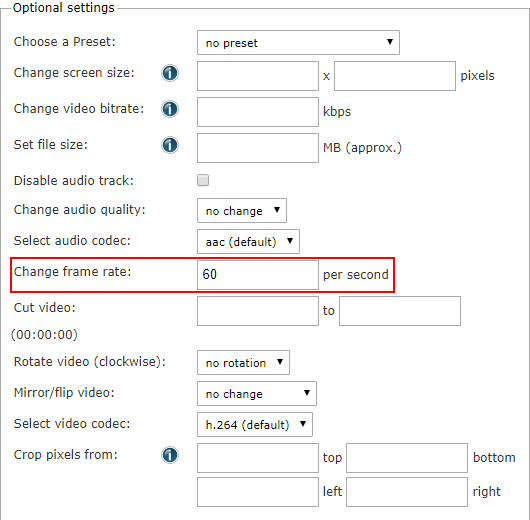
In the optional settings, you can easily set the frame rate you want for your video. Then, just click on the convert button and the file you will receive after a few minutes will have the correct frame rate. Importing this video into your project should not cause any issue anymore.
Rare Or Unsupported Video Files
Problem: Video file format is not supported by the software
Solution: Convert to another format
There are many different video formats out there. Some are more common than others and thus better supported by different video editing programs. Most cameras can also export the videos you shot in one of these more common formats. Yet, it may still happen that you produce a video in a format that’s less compatible or that you grab or rip a video in another format (e.g. M2TS, AMV, DIVX, etc.).
If that’s the case, you can easily convert them into one of the following formats which are supported by most if not all video editing software:
Video File Size Too Big
Problem: The video's file size is too big
Solution: Reduce file size in different ways
Usually, the editing software you use shouldn’t have an issue with video files that are quite big. Depending on your computer and the age of the software, however, it might be that the program crashes or stops responding when you upload a video that’s quite big. In these cases, reducing the file size can help your program to still function.
There are a few ways to do so. They come with advantages as well as disadvantages. You can decide which one(s) best fit your working process.
Change Dimension
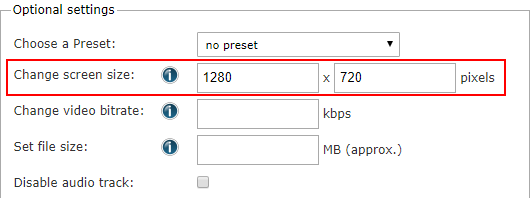
This one should be handled with some caution. Not that it could break your video, but by changing the dimensions of your video has an impact on its quality. For example, when uploading a video to YouTube, you should keep the dimensions of 1280 x 720 px to keep a “minimum HD” quality. Thus, when reducing your video’s dimensions, you should keep certain minimums in mind.
The optional settings of a video converter can be used for reducing the video dimensions as well.

Let’s have a look at how changing the video dimension affects the file size of a video. We tested with a video from Videezy.com. The table below shows the specifications of the original MOV file as well as the converted MOV after the reduction.
Reduced Video Dimension |
|
| Dimensions: 1920×1080 | Dimensions: 1280×720 |
| File Size: 131 MB | File Size: 0.721 MB |
130.279 MB |
|
Change File Format
Another way to reduce the file size of a video is by changing the format. This was, in the beginning, just a theory, but we found proof that changing the file format actually has an impact as well. Using our video again, we conducted a test and converted it to MP4. The result can be seen below.
| File Size: 131 MB | File Size: 4.29 MB |
126.71 MB |
|
As seen above, the MP4 file is smaller in file size than the original MOV. Thus, converting the file to MP4 can also help our video editing program to handle the video.
Cut The Video
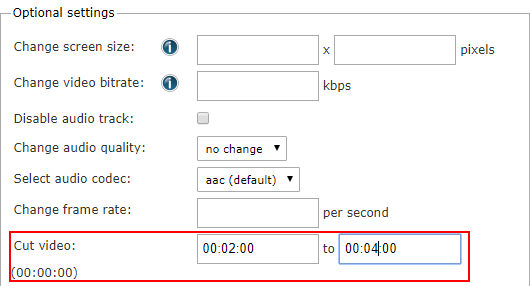
The last way we want to explain is cutting a video. Of course, you usually do this in your video editing program, but if a large video crashes your program, you can also cut it beforehand. On Online Convert, you can do so by specifying a start and end time for the video. The screenshot below suggests, that we cut the video into chunks of 2 minutes.

The disadvantage of this is that you have to import the videos separately and ice them back together. If you want to cut off parts of the videos anyway, though, it already gets some of the work done.
Conclusion
There are some errors and issues you can run into when preparing a video to upload it to YouTube, Facebook or your website. Importing videos into a video editing program is sometimes not as easy. With all the tips and tricks above, you can circumvent and solve some of these issues though!
